Night Photography
I was reading an article in my favorite magazine the other day and was rather disturbed to find an article of the 'how-to' variety teaching ineffective crime scene techniques. The article covered night photography and different methods you can use to take pictures in low-light situations. I'll admit that capturing images at night can be tricky, but the methods taught in this article were just wrong. The author explains how to use emergency lights, spotlights, and street lights to illuminate the scene. There are even photographs that show these techniques at work. The problem with the photographs is that they are all mid to close range photos that you can take easily with an on-board flash. Only one photograph is an overall scene picture which only came out because of ambient lighting (which means you could have put the camera on 'automatic' and gotten the picture). All of the emergency lights, spotlights, and street lights are actually harming the photographer's efforts.
When a regular flash won't work, you do have options. You can take a crappy picture like what was in the magazine. You can put the camera on a tripod, set the exposure levels to automatic, and use a shutter release cable. (A little information on automatic metering....There is nothing wrong with it! It is actually more accurate than any other type of metering provided you use it correctly.) Or you can do it the right way - you can "Paint with Light".
 Painting with light takes practice - preferably before you need it at a scene. It also requires a fairly decent camera which most Crime Scene Units should have. It also requires a separate flash unit which, again, most Crime Scene Units should have. Place the camera on a tripod, set the shutter speed to 'bulb', and attach a shutter release cable. Disable the autofocus and on-board flash. Set up the camera and set the focus. Get the scene as dark as possible and lock open the shutter. With your flash unit in hand, walk to the far end of the scene and start flashing as you walk back toward the camera. Three quick tips:
 1) Hold the flash at a slight upward angle to avoid hotspots on the ground,
2) Avoid pointing the flash back toward the camera,
3) Wherever you stood for the first flash should be where you aim the second flash. Wherever you stood for the second flash should be where you aim the third...and so on.
These photos were taken by a co-worker during practice. The first uses just the on-board flash. The second was painted with light and actually could have been done a lot better, but that's why we practice. They are, however, much better than what was shown in the article and can be done by anyone who is willing to put a little effort into their work and not look for shortcuts. It works with 35mm and digital, although you can see the immediate result with digital.
When a regular flash won't work, you do have options. You can take a crappy picture like what was in the magazine. You can put the camera on a tripod, set the exposure levels to automatic, and use a shutter release cable. (A little information on automatic metering....There is nothing wrong with it! It is actually more accurate than any other type of metering provided you use it correctly.) Or you can do it the right way - you can "Paint with Light".
 Painting with light takes practice - preferably before you need it at a scene. It also requires a fairly decent camera which most Crime Scene Units should have. It also requires a separate flash unit which, again, most Crime Scene Units should have. Place the camera on a tripod, set the shutter speed to 'bulb', and attach a shutter release cable. Disable the autofocus and on-board flash. Set up the camera and set the focus. Get the scene as dark as possible and lock open the shutter. With your flash unit in hand, walk to the far end of the scene and start flashing as you walk back toward the camera. Three quick tips:
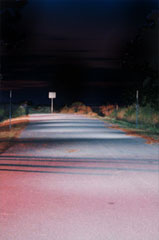 1) Hold the flash at a slight upward angle to avoid hotspots on the ground,
2) Avoid pointing the flash back toward the camera,
3) Wherever you stood for the first flash should be where you aim the second flash. Wherever you stood for the second flash should be where you aim the third...and so on.
These photos were taken by a co-worker during practice. The first uses just the on-board flash. The second was painted with light and actually could have been done a lot better, but that's why we practice. They are, however, much better than what was shown in the article and can be done by anyone who is willing to put a little effort into their work and not look for shortcuts. It works with 35mm and digital, although you can see the immediate result with digital.
posted by S/Sgt. McManigal at 10:18 AM
![]()
![]()


<< Home